Showing posts with label Sewing. Show all posts

15.10.12

Mad Scientist Monday #23: Learning how to mind the gap...easy fix for blouses and shirts

Day 295

I know its been a long time blogging but in my defense I have been busy, crazy busy with sewing orders and stepping toes into the local film industry costuming, set and the like.  Today our Mad Scientist is the 'Other Mother' from the book Coraline by Neil Gaiman.  Perfectly creepy as a book for (not too young) kids, teens, adults and as a read aloud for extra scary bits.  You can read about it more in this great review I found online if you are not familiar with Gaiman's work already.  So as not to give it away if you have not read Coraline, the Other Mother makes your choice to stay in her world permanent by sewing black buttons onto your eyes.


In tribute to this little bit of creepy we are going to learn how to sew snaps into the gap of a shirt.  I call this the 'Boob Gab' because all of us who are well endowed on top know button down shirts don't leave any surprise as to what we are wearing underneath.  To fix this we generally buy bigger sized shirts and look like we are swimming in them, wear a bra color that blends or never buy buttondowns ever again entirely.  I will help you get over gap trauma, even if you say you can't sew you can do this and learn to love button downs again.

You are going to need:
Hand sewing needle (About an 1 1/2" long and thin)
Thread to match your shirt.
Pencil
Sewing & Knitting Gauge (see photos)
Snaps (smaller than your button size but not the tiny ones) nickel or sliver if lighter colored shirt and black if dark

Look it's a gap. Usually we notice because someone has said 'oh nice bra color you are wearing today' or they don't say anything but obviously uncomfortably (for the gap wearer) stare right through the gap into your bare naked soul causing you to want to throw on a full body parka, run screaming from the room or commit an act of violence against the starer.  Unless you have a job where the boob gap is an asset then this fix is for you.

The boob gap usually occurs after the 3rd button down, counting the one at the neck.

We are going to place our snaps halfway between the 3rd and 4th button.  Your gap placement might occur at a different location so make sure you put your shirt on and check the location before sewing.  Use your gauge to determine the center point between the buttons. I measure from center of top button to center of bottom button to get the perfect central snap location.

See the hole in the blue gauge marker?  Place a light pencil dot right through the hole marking the center point.

Next we want to measure how far in from the edge of the shirt to align with the button row.  Move your gauge in until the tip is even with the center points of the top and bottom buttons.  Mark lightly with a pencil.  These marks should be right on top of one another if you have measured correctly.  Always best to measure twice, sew or cut once~usually I do it three times and then stand back to look and make sure.


Here I am marking my points.

You get to do your measurements all over again for the buttonhole side!  Instead of the center of the buttons as your top and bottom points use the center of the buttonholes.  Don't just take it for granted that they are absolutely aligned from one side to the next because not all clothes are manufactured of equal quality.


Now you get to sew them on.   While there are only so many ways to sew EVERYONE sews on buttons and snaps differently so do what is comfortable to you.  

Thread your needle and a simple knot in your thread at the bottom.  Work the side with the buttons first.  Staying on the snap side make a stitch through the marked point pulling the thread through to the knot.

Take the female part of the snap and hold it onto the marked dot with your finger or thumb of the hand opposite of the one you sew with.  Coming up through the top layer of fabric only each time (don't sew through to the back, there is usually a double layer of fabric at least for button plackets), using small stitches, go through one of the 4 attachment holes up to 6 times.

To go to the next attachment hole make a small stitch diagonally through the top layer of fabric, behind the snap and come up through the next hole.   Do this with each hole until you come back around to the first one.

To finish the thread I like to make a couple of horizontal stitches through the fabric, back and forth behind the snap.  Then I tie the end to one of the stitches, weave the needle and thread out the other side and snip.

Next you will sew the male side of the snap onto the marked point between the buttonholes on the other half of the shirt.  Proceed in the same manner as described above.  Since this is the side of the shirt that people see make sure your stitches do not show through and stay within the layers of the button placket.

NOTE: When you take them off the cardboard sheet them came on you will see what I mean about female and male parts of the snaps.  It's simple Snap Biology 101.

Another tip is if you are very well endowed DON'T give in to the temptation to purchase a ginormous shirt thinking that will help close the gap.  Fitted is always, always a better option~add multiple darts around  the waist if you have too.  If the gap is still there sew another snap between the 4th and 5th buttons or in the center directly below the other one (between the next two buttons) so that you will stay covered.


Gap minded. 

What will you create today?

4.6.12

Mad Scientist Monday #22: Renovations to the Lair

Day 288
If you have seen this movie from the 80s you know how many things went wrong with this house and how much money they kept spending to repair it.  Determined NOT to go down that road (of course our house isn't that old either) we have been wanting to make some low budget renovations.

If you want to see a tour of the house used in 'The Money Pit' movie adventure over to the Between Naps on the Porch Blog~I love her movie house tours.

Our first decision was to rip up the downstairs carpet and paint the cement floors.  We live in the desert and  quite frankly having carpet where sand blows in the house almost constantly is just a waste.  We saw the evidence of this one we pulled up the pad and there was sand all underneath, ew-no wonder no matter how much we vacuumed it just still felt dirty to walk on, ew.
Click image to be taken to the IMDB site for  more movie info.
We regularly scour our local Habitat for Humanity's ReStore to get ideas on how we can incorporate inexpensive projects to change the look of our home.  If you have never been in one of these stores not everything is used, I often see new tags on large things like kitchen cabinets.  Its like a candy store to walk around and see the old hardware and fixtures.  For this renovation we were able to get some painting supplies and will be heading back to check out their trim for the edges of the walls and where the floor meets the tile.

By far the hardest part of this renovation was moving everything out.  We worked on one room at a time and since it took less than a week to harden and dry completely so 2 weeks were not really too big of a disruption.  After pulling the carpet and padding up we had to scrape up the tacking strips and glue bits along the edges.  We filled in any gouges or cracks with a cement filler~we did find some long cracks in the sewing lair but they were not that wide and we felt like they were not a function of the foundation cracking but a more natural result of cement drying~cracks happen.  And if the cracks do widen we can see that with them being painted and visible now.  Once the cement filler dried we then sanded that down.  After laying on 2 coats of a mildew, water resistant primer and letting that dry for a few hours it was time to put on the turquoise.  We did put 2 coats of this down as well.  Both of the paints went down smoothly with a roller and were really consistent and even.  Neither of these paints smelled hardly at all and they both cleaned up quickly with water.

We did not put on a top sealer yet, we are going to wait and see how this holds up, my girls and I are VERY sensitive to smells and chemicals which could trigger asthma attacks.  Right now we have found some little nicks that we will be touching up this weekend but those are from moving furniture back in and are seeing it stand up well to traffic and spot cleaning.

We chose turquoise because we love bright colors, you can see our walls are painted similar to what we see in the desert around us every day~dark green, golden yellows, an orange spice~so we decided on adding in the color of the sky at our feet to the mix, with over 300 days of regular sunshine and these bright blue skies to see in Albuquerque we wanted to bring that indoors to remind us of the beautiful things in life.

Primer: Zinsser Bullseye Primer for all Surfaces
Paint: Behr Premium Low Luster Enamel Porch and Patio for Cement
Cost < $150

Trim and some sort of ceiling tiles to be added in later.


My sewing lair sits in the front room where you walk into the house.  I was tired of this area looking jumbled and disorganized when clients come over so we moved everything out, painted and then moved things in selectively getting rid of a lot of clutter and arranging the largest furniture pieces in ways that made the space look more open.


One more future project will be to repaint these file cabinets.  I am thinking some bronze or silver spray paint.  These cabinets were originally in a corner behind my large cutting table and were not easy to open and search through. 


Here you can see the view of my desk towards the front door.  I placed a painted piece of MDF (Med. Density Fiberboard) across 2 bookshelves to consolidate space and give me easier access to patterns and books stored on the shelves.


I painted the MDF that I used for my desk an Ebony Glossy Black.  I don't normally incorporate black into my color schemes but I am in love with this desk now.


Originally I had these tables combined into a large cutting table but I decided to separate them and I am finding that I enjoy working with the multiple cutting areas more since I generally have more than a handful of projects going on at a time.  You can see I have a better view of the Frog and Lizard Terrariums now and this weekend I noticed that they were more actively coming up to the glass and watching the outside world too.


Here is a view of the overall space and how I have the light table, my serger, sewing and then planning areas all comfortably spaced out with a large walkway to the right side from the front door.  My family even likes this space better and my girls kept coming in and digging through patterns and books or just to sit in the chairs and talk.  The only other piece I think I might add is a small bench for clients but we shall see, right now I am more than happy to have the open areas for now.


I have been decorating my space with bouquets of roses from my garden every day and they look stunning against the black desk~its just such a nice clean and calm color.

Surprisingly even with all the moving around the sewing continued here and as you can see by my lack of blogging I have been busier than ever.  

What will you create today?

16.4.12

Get my Thrills Thrifting #10: Off the Shoulder Creations

Day 281  FINALLY finished another really awesome project.  Bill Fort, the Owner and Artist behind Lovelight Boutique gave me a hand drawn design and some thrifted fabrics to turn into off the shoulder creations.  

Find these and other unique creations at Lovelight Boutique here in Albuquerque 147 Harvard Dr. SE, one block from UNM and Central! Or check out Lovelight's Facebook page  it really has a selection that makes you want to put the fun back in fashion again!  

I love turning 2D ideas into tangible goods.  It keeps the creative brain working overtime!
This blue one is a sort of crepe material but sturdier.  It has a nice flow and feel to it.

 This nautical satiny print is my favorite of the bunch.  Very soft.

 This was originally a large polyester scarf but was too skinny to fit over my mannequin.  Very cute sheer print.

A cotton tie dye print.  Reminds me of Summer!

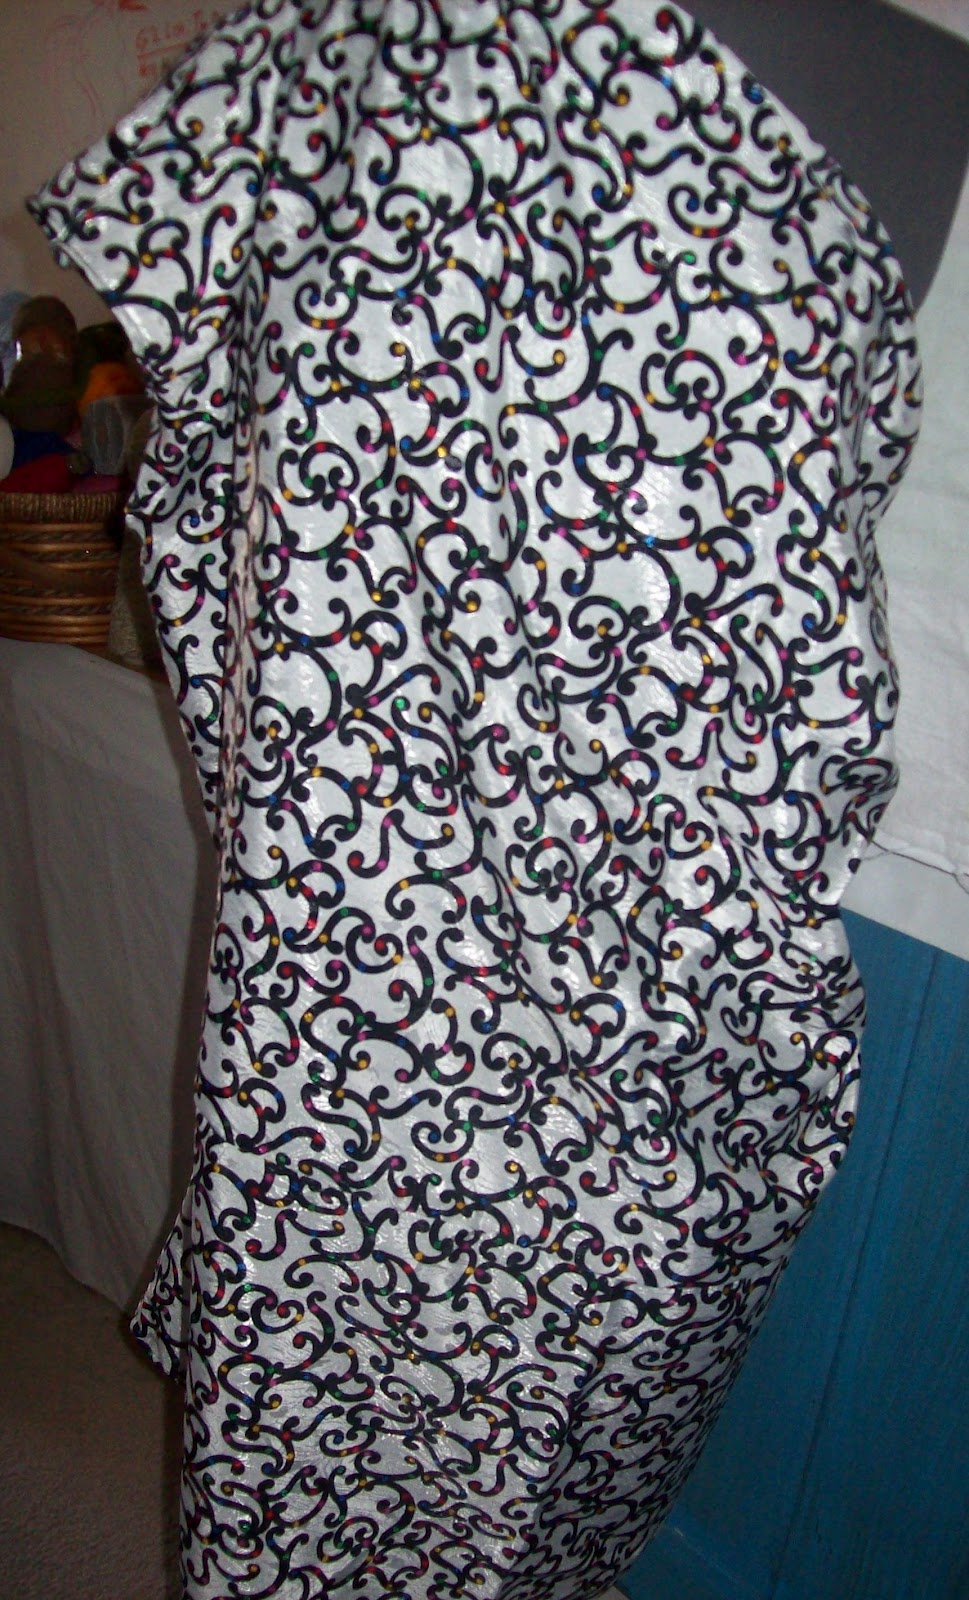
I am calling this the mardi gras print because it was satiny with a white on white sparkly print and over that the black ironwork type swirls and multicolored dots.  Very silky on the skin.


Here are a couple of examples of how they look like on.  You can wear them so many ways...just plain off the shoulder, cinched up with a sparkly brooch on one side or both or tied and draped over a cute belt!  This is the type of top that can be used to dress down or dress up depending on how it is worn.

Go check out these and other creations at Lovelight Boutique!


What will you create today?

12.3.12

Acts of Kindness #1: Albuquerque Firefighter & Kiva Loan Followup + FREE MONEY

Day 242  Every month Momtastic Stitchery gives back to an organization or person in the community.  That's 10% of all profits for that month.  Momtastic's Acts of Kindness information HERE.


February Followup:   A huge upswing in wonderful clients and projects helped me to donate our goal of $25 to a business woman through the Micro Loan group Kiva.org  I chose Piedad, a seamstress in Peru.  I was the first person to loan her money and within days others had also contributed so that she met her goal of $575 so that she can buy supplies like fabric, zippers and elastic.  This is her second Kiva loan so I have confidence that she will succeed in her venture.

Here is Momtastic Stitchery's Kiva profile so you can see the progress of the loans.  Once this one is paid back I will be turning it around to someone else.

Would YOU like to donate to Kiva but don't have the funds?  You can sign up and send FREE money to a person of your choice FREE CLICK HERE "These free trials are funded by Reid Hoffman, Kiva board member, LinkedIn founder, and co-author of newly released The Start-Up of You." 
NO REALLY ITS TOTALLY FREE!  This is your chance to make a difference FREE.  No obligation other than creating an account!


March:  Meet Vincent Cordova, a local Albuquerque Firefighter who will be heading out of state for surgery on a rare brain tumor.  You can read more about him HERE.  At the end of the month I will be donating funds directly to his Paypal account.  I am also donating a lap blanket for an upcoming silent auction (more on that when I get details).  If you would like to help he has a Paypal button HERE.  I have spoken with friend and family and more than anything now he really just needs cash to help pay for his expenses and treatment as well as your prayers.


Well sewing calls, lots of clients to create projects for this week!  April's Act of Kindness will be announced soon so keep any eye out.

What will you create today?

28.9.11

3.8.11

Everyday I'm Shuffling....

Day 163

Seems like the Summer is coming to a roaring close and I find myself playing this song over and over again in my head as I work to catch up on all the projects that were dancing around in my head and backing up on my sewing calendar.  But we're getting 'em done:
 redoing a wall of my creative lair
finishing yet another tshirt blanket (JOY!)
lots of back to school thrift store redos 
a HUGE pile of UFOs (Unfinished sewing projects)
and some little lightweight cotton woven blankets with cute little chenille appliques that will get fluffier as you use them more
More later...can't wait to show you these fashion upcycling projects!


PS I am in the process of working on a tshirt blanket with 18" squares~needed a bigger option designs on large(+) shirts~  


What will you create today?
Another awesome tshirt blanket!

Main wall of the Creative Lair

Another view of the main wall in the Creative Lair

Ladybug/Bumblebee chenille applique blanket

Simple woven with bias trim blanket

Closeup of Bumblebee Chenille Applique

Close up of Ladybug chenille applique

16.5.11

So...whatcha doin'???

Day 158

Me? Not a whole lot except doing some healing from various extreme stressors in my life lately.....
....petting Sokka the angel baby cat...don't judge he is my catdog momma's boy...:)

....embellishing jeans with fabric scraps....

.....my jeans, yes I finally did something for myself and I love them....

.....working on some kitchen towel hand embroideries.....don't you just love these? so old fashioned looking....

....eating comfort foods, like our fancy bread with feta cheese, vinegrette, olive oil and spices from the garden...salivating now...

....enjoying sighting our first ladybugs of the season....

...planting eggplant....

...egyptian walking onions....got some chives and catnip in this part too...my cats love to hit the nip...

....various tomatoes...

....oregano....and mints, rosemary, basil, athena muskmelon, lemon cucumbers, zucchini....can't wait to do some harvesting!....

...and the pond life is starting to come back which makes us all happy because at night we can hear the water trickling....


...writing simple poetry....

This life I am living
I travel many roads
I take many journeys
There are always crossroads to choose
There are always mistakes to be made
I smell, I taste, I love, I see, I hear, I drink deeply from this life I lead
I celebrate my person
I am most distinctly me
~Tabitha

I am a pick myself up immediately kind of person but these past things have taken a lot longer and I just needed space to feel and heal.....its getting better every day.....I knew I was gonna be ok when I started sewing and creating again!

What will you create today?

Total Pageviews

Page Tracker

Pagerank

Labels

Sewing (135) Girls (90) family (87) Inspiration (78) Holiday (48) Nature (41) Backyard (38) vintage sewing (38) thrifting (36) hand sewing (35) Taichi Tabananica (33) cats (30) recycle sewing (27) Mad Scientist Monday (24) music is art (23) hand embroidery (22) 365 Challenge (20) embroidery (20) Memory Lapse (19) Scenes from my Sketchbook (19) Silence will Fall (19) homeschooling (19) Touch My Stitches (17) art (14) Cooking (12) Scrapbusting (12) 80s (11) costumes (11) fabric collage (11) S#*ts and Giggles (10) Tshirt Blanket (10) vintage fabric (10) altered book (9) Covered in Stitches Contest (8) Flashback Creations (8) a good book (8) contest (8) crafting (8) flowers (8) sketching (8) Halloween (7) Sunday Best (7) Tshirt Pillow (7) beads and stones (7) books (7) Japan (6) Touch Me Thursday (6) business is an art (6) buttons (6) clothes (6) snow (6) Friends (5) Momtastic's Whimsey (5) New Mexico (5) Whimseybox (5) christmas (5) colorful blankets (5) cosplay (5) fabric (5) Albuquerque (4) Classes (4) Copic (4) Momtasterrific Craftery nights (4) needlepoint (4) painting (4) pillows (4) sewing machines (4) stuffie (4) vintage goodies (4) vintage patterns (4) aprons (3) crafting for a cause (3) doctor who (3) felt creations (3) movies (3) paper collage (3) woodland friends II (3) Acts of Kindness (2) Aki Matsuri (2) Artfire (2) Comic Con (2) Creative Lair (2) Easter (2) HB Happy Stacker (2) Mediterranean Viewscape (2) Memory Gifts (2) Memory Pillows (2) Space (2) Summer (2) UrbanThreads (2) Video Games (2) antiques (2) birthday (2) crafting event (2) dog costume (2) feltie (2) kid art (2) memory blankets (2) ornaments (2) recycling (2) roses (2) scarves (2) sculpture (2) upcycling (2) working on (2) 1 million pillowcase challenge (1) 10% (1) 70s (1) 8mm (1) ATC (1) Chinese Calligraphy (1) Craft and Cake (1) Give Back (1) Giveaway (1) Haunted House (1) Home Renovations (1) IHSW (1) Int'l Hermit and Stitch Weekend (1) Kiva (1) Lovelight (1) Monkeys (1) Mother's Day (1) Operation Castle Redo (1) Pens and Markers (1) Scotland (1) Spongebob Squarepants (1) Tabjuice (1) anime (1) architecture (1) bags (1) batik (1) colcha (1) collaboration (1) craft night (1) crocheting (1) curtains (1) decorating (1) doodle (1) forest fire (1) hair (1) jewelry (1) kid pranks (1) knick knacks (1) linens (1) manga (1) masks (1) monsters (1) nerd goodness (1) pokemon (1) printing (1) raven (1) repairs (1) ribbon (1) shells (1) snaps (1) solstice (1) star trek (1) steampunk (1) stockings (1) thread (1) vampires (1) weaving (1) website (1)