Showing posts with label Whimseybox. Show all posts

13.10.12

Momtastic's Whimsey #5: Nevermore....Poor Lenore

Day 295:  Have you received your box of craftiness of want to know more?  Click here to check out Whimseybox's website.

I am a member of the Whimseybox Design Team and will be putting together weekly crafts and projects based on the items that come in the monthly boxes.  I try to use only what I receive in my boxes.  I am proud to be a part of this group of extraordinarily crafty people.  If you want more ideas go to Whimseybox's Portfolio of Projects.

Hands down this was THE BEST WHIMSEYBOX I have EVER received.  Why?  because the DecoArt Ink Effects were new to me and I did not have to use anything else for this project but what I received in the box~HAPPY DANCE!

You can read more about Decoart's Ink Effects HERE.

Supplies from the September Whimseybox:
Thin paintbrushes
Red Decoart InkEffects Paint
Cotton/Poly Scarf

Other supplies:
Iron
Computer paper
Imagination!
Pencil


It was so easy literally a caveman can do it.  You just start painting.  You can lightly sketch with a pencil your design, print a design or even finger paint it on.  Remember if you write words reverse them so they will show up the right way when ironed on.


I randomly drew out a raven and sort of a skeletal hand.  In the ironed on pictures you can see where the prints were lighter in the ligher painted areas and darker in others, this could produce some really interesting effects.


Then you let the paint dry for 30 minutes and iron it onto your cloth.  Apparently you can get 3 transfers per painting piece but I only did one for these.


The colors paint darker than they print but that doesn't really bother me too much.  There is a free guide you can look at to see the colors before and after, check in the aisle where you buy your paints.

Once they dried completely the fabric was not stiff nor did it crack when moved.

I have never been this excited about a new craft/paint product as I am with these.  I foresee lots of possibilities and plan on purchasing a bunch of new colors soon.
Apparently they work best on their own with a more synthetic than natural fabric BUT there are sprays you can purchase to prep the natural fabrics to hold the paint AND you can wash these!!

You can see lots of other projects at the Decoart Gallery page.

This is how much I am in love with these paints.....I hope they spark something in you too!


What will you create today?


9.7.12

Momtastic's Whimsey #4: Doodle Cover Art

Day 293: Have you received your  box of craftiness or want to know more about what it is?  Click here to check out Whimseybox's website.

  I am a member of the Whimseybox Design Team and will be putting together weekly crafts and projects based on the items that come in the monthly boxes.  What I am going to try to do for my participation in the project is A. use primarily what comes in the box and B. not buy new supplies to enhance those projects but use what I have around the house.  I am proud to be a part of a group of extraordinarily crafty people.  If you want more ideas check out Whimseybox's Portfolio of projects.

I love to doodle and draw and I love to make TODO lists.  Marker+small cloth covered notebook+list lover=new list notebook for my purse, of which I have at least 2 because you never know when you get an idea or need to remember something and I know I can always find one and I love seeing my kids doodles because they use them when they are bored.

Simple but awesome because with doodling you start at one point, without a plan and end up with your book completely decorated.  For this project you need to really just relax and enjoy the process.  Any mistakes you make are not mistakes but things you can incorporate into the design.  HAVE FUN WITH IT!

Supplies from the March Whimseybox:
Ultra Fine Point Sharpie

Supplies from the May Whimseybox:
Spiral bound cloth covered notebook

Other Supplies:

Dreams & Imagination

The finished design of doodles.


Blank notebook
 I literally just put the marker to the corner of the cover and started drawing a line, not even trying to make my brain work ahead of my hand.  As it started to take shape towards the end I realized the influence of that Aesop fable with the crow trying to reach the water at the bottom of the jar and adding pebbles.   What subconscious part of my mind this came from and why I do not know.

Even the words I wrote just came out of no where. 

'Just a drop of whimsey' because apparently I was going for a water on pebbles type thing.

I just kept adding things until I was satisfied~not trying to do too much or try to force the image.

Its kind of awesome to just let go a little and create.  You should give it a go, it might not be as simple as it sounds but I think you might surprise yourself.
The one blue dot, I decided it needed to have some color and this was it.


Sneak peek at next week's Whimsey

Using the cork, embroidery thread and eyeballs!

What will you create today?

2.7.12

Momtastic's Whimsey #3: Decorate Your Hair


Day 292 Have you received your Whimseybox of craftiness or want to know more about what it is?  Click here to check out Whimseybox's website. 

 I am a member of the Whimseybox Design Team and will be putting together weekly crafts and projects based on the items that come in the monthly boxes.  What I am going to try to do for my participation in the project is A. use primarily what comes in the box and B. not buy new supplies to enhance those projects but use what I have around the house.  I am proud to be a part of a group of extraordinarily crafty people.  If you want more ideas check out Whimseybox's Portfolio of projects.

I could not resist that dark purple ribbon that decorated May's box.  Seeing ribbon makes me think of historical times when ribbons were the jewels of the sewing world, cheaper than lace and they added a bit of color or shine to an outfit.  I love the idea of wearing it in my hair to add a simple decoration of color to brighten the day.

DO NOT let the fact that this uses hand embroidery intimidate you, you CAN do this!  Remember to have fun!

Supplies from the April Whimseybox:
various buttons

Supplies from the March Whimseybox:
Ultra Fine Point Sharpie

Supplies from the May Whimseybox:
J&P Coats Embroidery Floss in Imperial Blue
Purple Ribbon

Other Supplies:
Scissors
Ruler
Hand Embroidery Sewing Needle
Scratch paper or sketch pad
Dreams & Imagination
UPDATE: Ribbon action shots


The finished hand embroidered ribbon headband.

Supplies that arrived in the May Whimseybox with the marker and buttons added from previous boxes.
  
The ribbon is about the width of this ruler which made it easier to draw lines to test  my designs.

First onto your sketch pad or scratch paper trace a line in pencil on either side of the ribbon.  Use the ruler to keep it straight. Do a few of them if you want to try some different designs for embroidery.

Pencil lines sketched to the width of the ribbon.
This will allow you to use the size of the ribbon to sketch out some embroidery ideas.

Sketches for the ribbon embroidery.
I sketched out a few designs before it coming down to these two.  I was going for pebbles or cobblestones scattered across the ribbon or chains linking the buttons.  I ended up deciding on the chains.

Choosing the thread and buttons.
 I chose 3 green flat buttons (ones with shanks might poke too much) and while I was going to work with the Violet Dark thread I felt I wanted more contrast instead and went with the Imperial Blue color.

Preparing to trace the design onto the ribbon.
Since the ribbon is too dark to really effectively transfer your design placing the ribbon next to the design on your paper will make it easier to free hand the image.  Using your fine line Sharpie marker draw the 3 circles where you buttons will go first in the same location as your design centered on the ribbon.

Design is ready for embroidery.
Using the Fine Line Sharpie again draw 4 'smiley face' lines (in place of the chains on my sketch) connecting the buttons.  You can see the 'smiley faces' in the image below.  I went almost to where the buttons would be going but you can even connect the lines if that works better for you. 

Needle is threaded and ready to embroider.
Cut off approximately 12" of your embroidery thread.  There are 6 strands in your thread, separate them into  2's, so that you will end up with 3 lengths of 2 strands each. 

Did your threads tangle and snarl when you tried to separate them?
Let's try again.  Either cut another length or smooth the snarled threads back into a line.  Hold the strand in between your fingers and let it hang down.  Look close, you should be able to see the tops of the 6 threads, pull on them one at a time, SLOWLY, and pull them up and away from the rest of the threads.  Once you have them all separated take 2 of them and smooth them back together leaving the others in a safe pet and child free/proof zone for you to come back too.  

Now thread your needle!! Here is how I personally do this:  
needle in left fingers with eye visible on top
smooth end of thread with fingers or wet it a touch by 'kissing' it between your lips
then thread it into the eye and pull about 3" through
(Bad eyes or unsteady hands? There are needles with slots in the eye that help you place the thread in them or use a needle threader.)
set your needle and thread down on the table
for this project make a small knot in about 1" from the end of your thread length so that it won't come through the fabric
Now you are ready to sew!

Tip:  Are your loose threads suddenly missing and you SWEAR you put them on the table in front of you?  Don't fret just look on the floor, your pants or generally your elbow where they usually hide, thread likes to cling especially to other fabrics!

Make a tiny knot in the end of your thread length.
Starting at the left side of the 'smiley face' furthest to the left we are going to make Chain Stitches using the line as your center.  (AHA NOW you see why I drew a line instead of chains to follow!)

Chain Stitch
No really its EASY just breath and have confidence!
To make the first chain stitch in your chains.
Start at the tip of the furthest line to the left.
Bring your needle (with thread) up through the fabric until it hits the knot.
Bring the needle back down right next to, nearly on top of the first stitch.
Slowly pull the needle and string through the underneath part of the fabric leaving enough for a tiny (appx. 1/4") loop.
Now bring your needle up on the line approximately 1/4" away from the first entry point.
Make sure the needle is at the tip of the loop on the inside.
Your subsequent stitches will start approximately 1/4" away from each other on the line with each one forming the next loop and holding the previous loop down.

To finish instead of making another loop you just come down on the other side of your last loop and make a knot on the underside of your fabric.

You probably have enough length along the 12" to do an entire 'smiley' of chain stitches.

Your stitches might not be perfect and they might wobble a little but each stitch is a learning experience and NO ONE but you will notice that you messed up.  If it really bothers you, you can snip it out and start again but with this type of fabric the holes will show and it tears easily so be careful.  You can see in the image below my stitches were not perfect because it has been a while since I have worked this stitch and I was not paying attention as closely to the sizing and wobbled a bit but NONE of this is noticeable unless you look up close and know what you are looking for!

Here is a great video at one of my favorite hand embroidery and stitching websites, Needle N Thread

My sort of wobbly chain stitches.
Last you get to add the buttons.  This is a little tricky just because the fabric is slippery but there are only 3 and no holes to make so easier than buttons for clothing!

Find the center of where each button will go and place a tiny dot with your Fine Line Sharpie.
Using 2 strands approximately 8" in length with a knot in the end poke the tip of your needle at the dot just far enough through the fabric so that you can place your button on the top of it.
Holding your button in place with your thumb pull the needle up through the hole and then back again down through another hole in the button.
Alternating buttonholes continue on this pattern until the button feels secure.
When you are finished, on the backside of the fabric, thread the needle through the back threads of your button and knot to secure.
You will need to do each button individually.

Remember this is not couture, everyone sews their button threads differently so side to side or criss cross is NOT important to this project.

Tip: DO NOT pull the thread too tight or it will pucker behind the button.

The finished beautiful ribbon for my hair.

Sneak peek at next week's Whimsey
Using the sketch pad and the fine line marker!

What will you create today?

18.6.12

Momtastic's Whimsey #2: Summer Dreams


Day 291  Have you received your Whimseybox of craftiness or want to know more about what it is?  Click here to check out Whimseybox's website.

  I am a member of the Whimseybox Design Team and will be putting together weekly crafts and projects based on the items that come in the monthly boxes.  What I am going to try to do for my participation in the project is A. use primarily what comes in the box and B. not buy new supplies to enhance those projects but use what I have around the house.  I am proud to be a part of a group of extraordinarily crafty people.  If you want more ideas check out Whimseybox's Portfolio of projects.

Lately I have been slacking on not only blog posts but crafting with myself and my family.  I am not going to beat myself up or make excuses, we just got incredibly busy all at once and it was overwhelming and chaotic.  But because of all this busyness it reminded me that I needed to slow down and prioritize this helped me to create our list of Summer Dreams I will be showing you how to make today.

Supplies from the April Whimseybox:
Yellow tissue paper
Stencils
various buttons

Supplies from the March Whimseybox:
Various Scrapbook paper
Ultra Fine Point Sharpie
Small Round magnets
Elmer's Glue Stick

Other Supplies:
Scissors
Dreams & Imagination


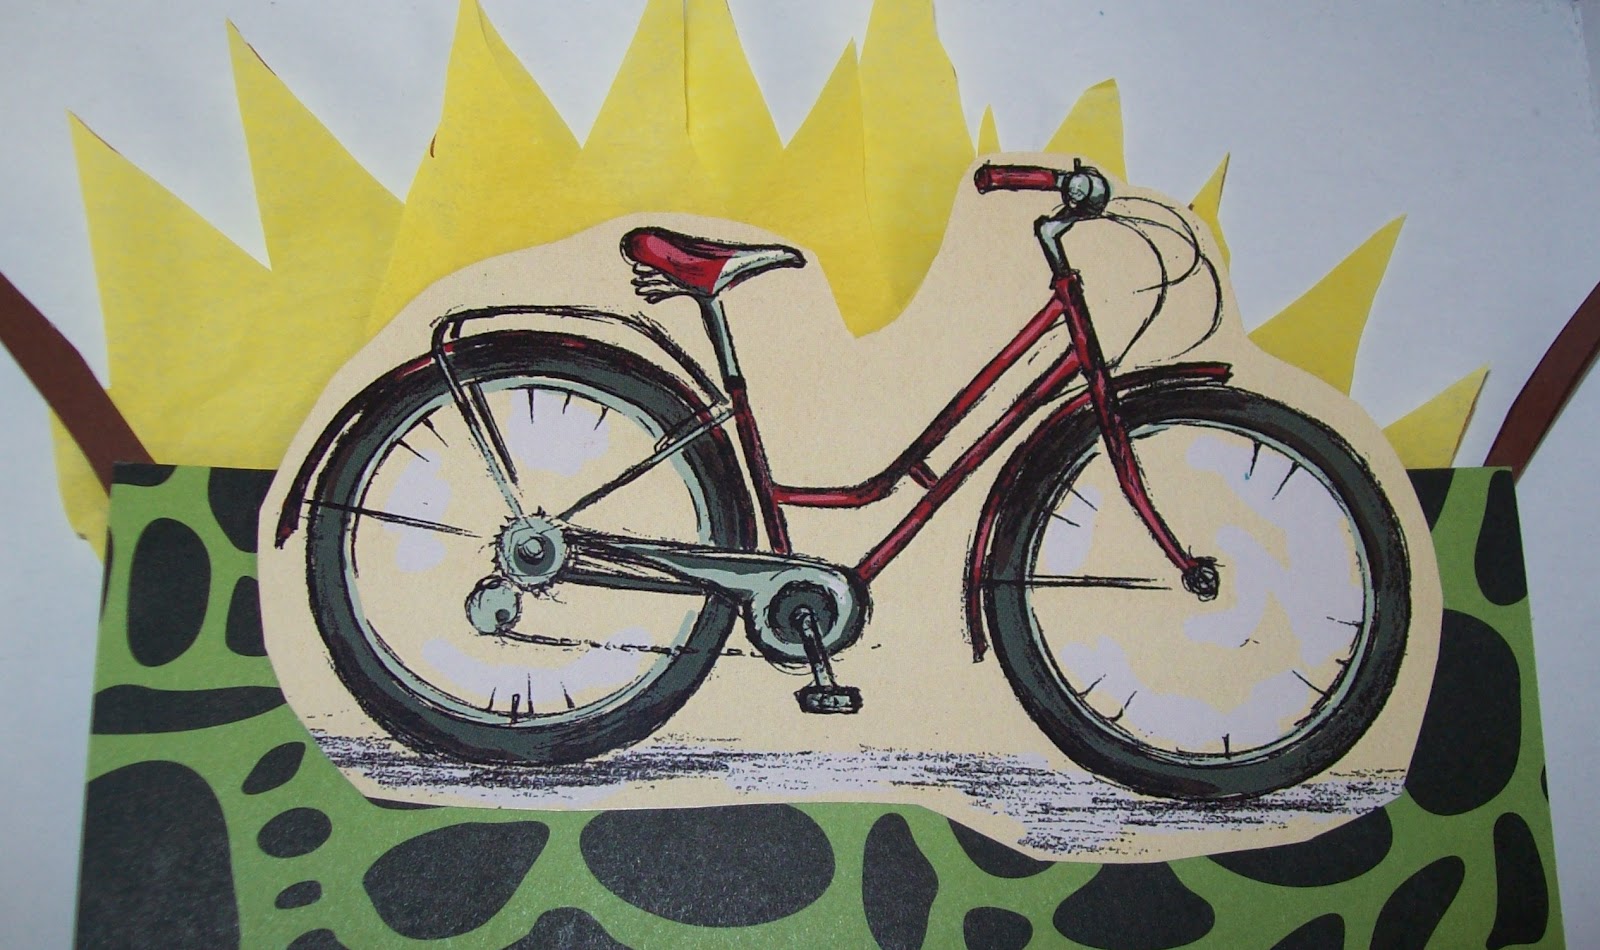
We started by trimming around the bicycle from Aprils Featured Artist work from HopScotch Graphics because I liked that the quote was speaking to exactly how I have been feeling lately with so much work, not enough play-out of balance....
“Life is like riding a bicycle, in order to keep your balance- you must keep moving.” Albert Einstein

Choose a piece of scrapbook paper that your bicycle can be riding or parked on. We chose this black on green because it reminded us of cobblestones.


Draw random 'rays of the sun' as pictured.  Does not have to be artistic or perfect because you are going to cut them out to place behind the bicycle.

Using your glue stick put the bicycle on top of the scrapbook paper, flip it over and glue the yellow tissue paper 'rays' to the back, shifting them around and overlapping them a little.  I only use 2 layers of tissue paper but you can use as many as you want.

Bonus Tip: Add more layers and color the tips of some of them with orange or red markers for more dimension.

Next we are going to surround our sun with colorful paper flowers, so choose a few of your favorite scrapbook paper colors and designs.

Grab the stencil you received in your Whimseybox~I happened to get flowers but any shape can be make into flowers~even squares.

Flip the scrapbook paper over to the back and using your fine line Sharpie trace out a few larger flowers and a few smaller shapes.  These can be cut out of whatever different designs and colors of paper you choose.

I happened to receive a stencil with the long curve to use as flower stems but if you don't have a stencil just trace a rectangle approximately 1/4" wide and 3" tall ~make it straight or curved.

Glue the stems along the back of the main portion to either side of your Sun's rays.

While your stems are drying you can cut out the flower shapes.  Remember we are not looking for perfection here just have fun with your project. 

Bonus Tip: Add more flowers for a wild Summer garden of dreams.

Glue the smaller flowers to the center of the larger ones and let dry.

Glue the flowers to the stems and let dry.  Right now when you pick up your project it will be floppy but once the magnets are on and it is hanging it will not flop down.

Take some of your favorite colored buttons and glue one to the center of each of your flowers.


Take one each of your small round magnets, remove the sticky paper, stick them to the back of a flower on each side.  If really only need one on each side and maybe one in the middle if you have added more flowers.  And  the top part of your project is complete!

Grab your favorite plain colored or lightly designed piece of scrapbook paper (you can even you a piece of notebook paper cut down to size).  This bigger piece is approximately 6" long by 5" wide.

Next cut a small piece of a contrasting color 1" wide by 4" long.  I had a piece in my box with dots on it that was perfect. 

Glue the larger piece to the center bottom back of the top decoration.  Then glue the smaller scrapbook paper to the right center edge of the larger piece, as shown below.

Using your Sharpie write 'Summer 2012' on the smaller piece along the side.  Then trace lines on the larger piece of scrapbook paper approximately 1/2" wide from each other.

Write down what you have done, plan to do, dream of doing, wish you could do this Summer.  The whole family can participate and if the list needs to be longer just add another piece of paper to the bottom.

Although the bicycle art and quote made me think about balance in my life, Summer is about freedom to explore, dream and plan so NOTHING is too outrageous to put down in ink.  The key to enjoying Summer is to not get too caught up in the have to do or planning but to enjoy each minute as it is given, however it happens.

Bonus Tip:  If you scrapbook then you can just take this list and add it to the pages from this Summer afterwards!

I put this in my Creative Lair instead of on the fridge to remind me to slow down and enjoy the process more.


What will you create today?


Total Pageviews

Page Tracker

Pagerank

Labels

Sewing (135) Girls (90) family (87) Inspiration (78) Holiday (48) Nature (41) Backyard (38) vintage sewing (38) thrifting (36) hand sewing (35) Taichi Tabananica (33) cats (30) recycle sewing (27) Mad Scientist Monday (24) music is art (23) hand embroidery (22) 365 Challenge (20) embroidery (20) Memory Lapse (19) Scenes from my Sketchbook (19) Silence will Fall (19) homeschooling (19) Touch My Stitches (17) art (14) Cooking (12) Scrapbusting (12) 80s (11) costumes (11) fabric collage (11) S#*ts and Giggles (10) Tshirt Blanket (10) vintage fabric (10) altered book (9) Covered in Stitches Contest (8) Flashback Creations (8) a good book (8) contest (8) crafting (8) flowers (8) sketching (8) Halloween (7) Sunday Best (7) Tshirt Pillow (7) beads and stones (7) books (7) Japan (6) Touch Me Thursday (6) business is an art (6) buttons (6) clothes (6) snow (6) Friends (5) Momtastic's Whimsey (5) New Mexico (5) Whimseybox (5) christmas (5) colorful blankets (5) cosplay (5) fabric (5) Albuquerque (4) Classes (4) Copic (4) Momtasterrific Craftery nights (4) needlepoint (4) painting (4) pillows (4) sewing machines (4) stuffie (4) vintage goodies (4) vintage patterns (4) aprons (3) crafting for a cause (3) doctor who (3) felt creations (3) movies (3) paper collage (3) woodland friends II (3) Acts of Kindness (2) Aki Matsuri (2) Artfire (2) Comic Con (2) Creative Lair (2) Easter (2) HB Happy Stacker (2) Mediterranean Viewscape (2) Memory Gifts (2) Memory Pillows (2) Space (2) Summer (2) UrbanThreads (2) Video Games (2) antiques (2) birthday (2) crafting event (2) dog costume (2) feltie (2) kid art (2) memory blankets (2) ornaments (2) recycling (2) roses (2) scarves (2) sculpture (2) upcycling (2) working on (2) 1 million pillowcase challenge (1) 10% (1) 70s (1) 8mm (1) ATC (1) Chinese Calligraphy (1) Craft and Cake (1) Give Back (1) Giveaway (1) Haunted House (1) Home Renovations (1) IHSW (1) Int'l Hermit and Stitch Weekend (1) Kiva (1) Lovelight (1) Monkeys (1) Mother's Day (1) Operation Castle Redo (1) Pens and Markers (1) Scotland (1) Spongebob Squarepants (1) Tabjuice (1) anime (1) architecture (1) bags (1) batik (1) colcha (1) collaboration (1) craft night (1) crocheting (1) curtains (1) decorating (1) doodle (1) forest fire (1) hair (1) jewelry (1) kid pranks (1) knick knacks (1) linens (1) manga (1) masks (1) monsters (1) nerd goodness (1) pokemon (1) printing (1) raven (1) repairs (1) ribbon (1) shells (1) snaps (1) solstice (1) star trek (1) steampunk (1) stockings (1) thread (1) vampires (1) weaving (1) website (1)