Day 291 Have you received your Whimseybox of craftiness or want to know more about what it is? Click here to check out Whimseybox's website.
I am a member of the Whimseybox Design Team and will be putting together weekly crafts and projects based on the items that come in the monthly boxes. What I am going to try to do for my participation in the project is A. use primarily what comes in the box and B. not buy new supplies to enhance those projects but use what I have around the house. I am proud to be a part of a group of extraordinarily crafty people. If you want more ideas check out Whimseybox's Portfolio of projects.
Lately I have been slacking on not only blog posts but crafting with myself and my family. I am not going to beat myself up or make excuses, we just got incredibly busy all at once and it was overwhelming and chaotic. But because of all this busyness it reminded me that I needed to slow down and prioritize this helped me to create our list of Summer Dreams I will be showing you how to make today.
Supplies from the April Whimseybox:
Yellow tissue paper
Stencils
various buttons
Supplies from the March Whimseybox:
Various Scrapbook paper
Ultra Fine Point Sharpie
Small Round magnets
Elmer's Glue Stick
Other Supplies:
Scissors
Dreams & Imagination
We started by trimming around the bicycle from Aprils Featured Artist work from HopScotch Graphics because I liked that the quote was speaking to exactly how I have been feeling lately with so much work, not enough play-out of balance....
“Life is like riding a bicycle, in order to keep your balance- you must keep moving.” Albert Einstein
Draw random 'rays of the sun' as pictured. Does not have to be artistic or perfect because you are going to cut them out to place behind the bicycle.
Using your glue stick put the bicycle on top of the scrapbook paper, flip it over and glue the yellow tissue paper 'rays' to the back, shifting them around and overlapping them a little. I only use 2 layers of tissue paper but you can use as many as you want.
Bonus Tip: Add more layers and color the tips of some of them with orange or red markers for more dimension.
Next we are going to surround our sun with colorful paper flowers, so choose a few of your favorite scrapbook paper colors and designs.
Grab the stencil you received in your Whimseybox~I happened to get flowers but any shape can be make into flowers~even squares.
Flip the scrapbook paper over to the back and using your fine line Sharpie trace out a few larger flowers and a few smaller shapes. These can be cut out of whatever different designs and colors of paper you choose.
I happened to receive a stencil with the long curve to use as flower stems but if you don't have a stencil just trace a rectangle approximately 1/4" wide and 3" tall ~make it straight or curved.
Glue the stems along the back of the main portion to either side of your Sun's rays.
While your stems are drying you can cut out the flower shapes. Remember we are not looking for perfection here just have fun with your project.
Bonus Tip: Add more flowers for a wild Summer garden of dreams.
Glue the smaller flowers to the center of the larger ones and let dry.
Glue the flowers to the stems and let dry. Right now when you pick up your project it will be floppy but once the magnets are on and it is hanging it will not flop down.
Take some of your favorite colored buttons and glue one to the center of each of your flowers.
Take one each of your small round magnets, remove the sticky paper, stick them to the back of a flower on each side. If really only need one on each side and maybe one in the middle if you have added more flowers. And the top part of your project is complete!
Grab your favorite plain colored or lightly designed piece of scrapbook paper (you can even you a piece of notebook paper cut down to size). This bigger piece is approximately 6" long by 5" wide.
Next cut a small piece of a contrasting color 1" wide by 4" long. I had a piece in my box with dots on it that was perfect.
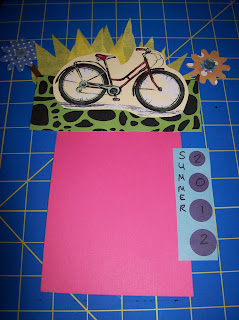
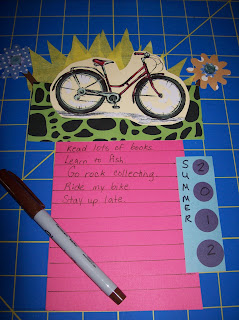
Glue the larger piece to the center bottom back of the top decoration. Then glue the smaller scrapbook paper to the right center edge of the larger piece, as shown below.
Using your Sharpie write 'Summer 2012' on the smaller piece along the side. Then trace lines on the larger piece of scrapbook paper approximately 1/2" wide from each other.
Write down what you have done, plan to do, dream of doing, wish you could do this Summer. The whole family can participate and if the list needs to be longer just add another piece of paper to the bottom.
Although the bicycle art and quote made me think about balance in my life, Summer is about freedom to explore, dream and plan so NOTHING is too outrageous to put down in ink. The key to enjoying Summer is to not get too caught up in the have to do or planning but to enjoy each minute as it is given, however it happens.
Bonus Tip: If you scrapbook then you can just take this list and add it to the pages from this Summer afterwards!
I put this in my Creative Lair instead of on the fridge to remind me to slow down and enjoy the process more.
What will you create today?


.JPG)


No comments:
Post a Comment